Format Guidelines for PSUGCAL
These are guidelines to making PSUGCal.org pages look consistent and to help with Wiki formatting in general. For more complete MediaWiki formatting help, visit https://www.mediawiki.org/wiki/Help:Formatting
Contents
Basic Formatting
| Code | Result |
|---|---|
| ''italic'' | italic |
| '''bold''' | bold |
| '''''bold and italic''''' | bold and italic |
| <nowiki>no ''markup''</nowiki> | no ''markup'' |
|
Single line breaks Use the html tag <br /> |
Single line breaks are ignored. Use the html tag |
|
Use a blank line for a new paragraph. Here is a 2nd paragraph. |
Use a blank line for a new paragraph. Here is a 2nd paragraph. |
Headings
Wiki pages look best when organized with headings, like the one above this line. Use at most Level 2 and Level 3 headers. (Consider the Title of the Page Level 1). Here is the wiki code for creating the headings:
| Code | Result |
|---|---|
== Heading Level 2 == Some text here === Heading Level 3 === Some more text here |
Heading Level 2Some text here Heading Level 3Some more text here |
A page with 4 or more headings will automatically create a table of contents
Bullets and Numbering
| Code | Result |
|---|---|
|
* For bullets start each line |
|
|
# Start each line |
|
Links
| Description | Code | Result |
|---|---|---|
| Internal Link |
[[Main Page]] |
|
| Bare External Link | http://www.psugcal.org | http://www.psugcal.org |
| External Link with Link Text Note the single bracket and the space between the link and the link text |
[http://www.psugcal.org PSUGCal.org] |
For consistency, most links will display best as a bullet item, with the link followed by a description. So for this:
- PSUGCal.org - Home of the California PowerSchool User Groups.
Type this:
* [http://www.psugcal.org PSUGCal.org] - Home of the California PowerSchool User Groups.
Posting Code
Use <pre>Insert Code here</pre> to post a multi-line block of code. Example:
<script>
$j(function() {
    /* place the family id row at the beginning of the table */
    $j("table:first").prepend($j("#familyidrow"));
....
For small chunks of code within a normal line of text, you can use <code>Insert code here</code> for a mono-spaced font.
- You type:
In PowerSchool pages you can use the PSHTML tag <code>~(curstudid)</code> to refer to the current student's internal id.
- You get:
- In PowerSchool pages you can use the PSHTML tag
~(curstudid)to refer to the current student's internal id.
- In PowerSchool pages you can use the PSHTML tag
Combine with the <nowiki></nowiki> tags inside the code tags if you need to prevent the markup from rendering.
- You type:
In PowerSchool pages you can use the html bold tag <code><nowiki><b>Bold text</b></nowiki></code> to produce a <b>bold font</b>.
- You get:
- In PowerSchool pages you can use the html bold tag
<b>Bold text</b>to produce a bold font.
- In PowerSchool pages you can use the html bold tag
Tables
The "Advanced" toolbar in the editor can help with table formatting. Here is an example:
{| class="wikitable"
|-
! Header 1 !! Header 2 !! Header 3
|-
| Row 1 Col 1 || Row 1 Col 2 || Row 1 Col 3
|-
|
A table row doesn't have to be one line of code
||
You can use line breaks for easier coding
||
It doesn't make a difference
|}
Will produce this:
| Header 1 | Header 2 | Header 3 |
|---|---|---|
| Row 1 Col 1 | Row 1 Col 2 | Row 1 Col 3 |
|
A table row doesn't have to be one line of code |
You can use line breaks for easier coding |
It doesn't make a difference |
Files and Images
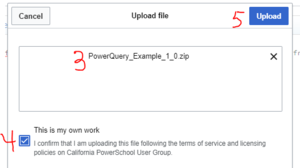
- Files and images must first be uploaded before they can be inserted in your page/article, but fortunately, the toolbar in your page editor can help.
- Click on the "Embedded File" button in your toolbar
- Click "Upload"
- Select or "Drag and Drop" your file
- Check the box to acknowledge that this is your work.
- Click "Upload"
- Add a description for the file or image
- Click "Save"
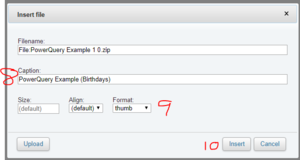
- Back in the "Insert File" dialog you should now add a caption
- Choose an alignment and format. ("None" and "Thumb" are good for inline images, otherwise the default will align to the right)
- Click "Insert"
You will end up with a line of code that looks something like this (Bullet added, which is always a good idea for listing a file)
* [[File:PowerQuery Example 1 0.zip|thumb|PowerQuery Example (Birthdays)]]
and it will display like this:
See the source code for this section to see how the screenshots are coded for inline display
Removing thumbnail to make a "download" only link
By default, MediaWiki will always try to display an image for your file. If this is anything other than an image that you want displayed on the screen, it is a GOOD IDEA to change the "File" tag to "Media", which makes it strictly a download link without trying to display it. It also then uses your caption as the link text instead of the file name. So in the example above, if we change "File" to "Media" and remove any alignment and formatting options to leave just the filename and the caption, we get this (description also added for best practice):
* [[Media:PowerQuery Example 1 0.zip|PowerQuery Example (Birthdays)]] - Very simple example of a PowerQuery for learning purposes.
and it will display like this:
- PowerQuery Example (Birthdays) - Very simple example of a PowerQuery for learning purposes.
If you'd like the filename listed as the link text, simply repeat the filename as the caption:
* [[Media:PowerQuery Example 1 0.zip|PowerQuery Example 1 0.zip]] - Very simple example of a PowerQuery for learning purposes.
- PowerQuery Example 1 0.zip - Very simple example of a PowerQuery for learning purposes.
Creating a new page
A page (also known in MediaWiki as an "article") is very easy to create.
Using Wikilinks
MediaWiki makes it very easy to link wiki pages using a standard syntax (see Links section below). Example: [[Hobbies]]
If you (or anyone else) create a link to an article that doesn't exist yet, the link will be colored red, like this.
Clicking a red link will take you to the edit page for the new article.
Simply type your text, click save and the new page will be created.
Once the page has been created, the link will change from red to blue (purple for pages you've visited) indicating that the article now exists.
Usually this is the best way to create a new page, because it means that right from the start, the page will be linked from at least one other place on the wiki.
For many wikis, normally there is no reason to create a page without first creating a red link to it. However, for PSUGCal, if you add [[Category:Contents]] anywhere on your new page, it WILL be automatically listed in the "Content Directory" we feature as the 2nd link in the left navigation menu.
From the search box
If you search for a page that doesn't exist (using the search box at the top) then you will be provided with a link to create the new page.
Using the URL
You can use the wiki's URL for creating a new page.
The URL to an article of the PSUGCal.org wiki is usually something like this:
https://www.psugcal.org/index.php?title=GPA
If you replace GPA with the name of the page you wish to create, you will be taken to a blank page which indicates that no article of that name exists yet.
Clicking the "edit" tab at the top of the page will take you to the edit page for that article, where you can create the new page by typing your text, and clicking submit.
Page Names and Titles
Pages will automatically inherit the page name as their title and main heading at the top of the page. If you're creating a new page, choose a name with that in mind. The pages will automatically alphabetize in the Content Directory, so choose names that users would logically expect to find in an alphabetical sort. Bad=Examples of sqlReports. Good=sqlReports.
Examples:
- Customization
- Health
- GPA
Adding pages to the Content Directory
To automatically have a page be listed in the Content Directory, add this code to any part of your page:
[[Category:Contents]]
You can edit the left navigation or "Sidebar" with a special link:
or
Find the "Quick Links" section and add an additional link with a special format consisting of:
- two asterisks + the page title + the pipe (|) symbol + the link text. You MUST have both the title and link text combo, even if they are identical, for the sidebar link to work correctly.
- Example:
** Customization|Customization
Meeting Page Template
- Meeting Template - Find naming convention for the page and the code template to create a new meeting page.

